A Hello Kitty cake is the perfect centerpiece for a birthday party, baby shower, or any celebration that calls for a touch of cuteness! Whether you’re a beginner or an experienced baker, creating this adorable cake is easier than you think. With the right ingredients, tools, and step-by-step instructions, you can make a stunning Hello Kitty cake that looks like it came straight from a professional bakery.
In this tutorial, we’ll guide you through the entire process—from baking the perfect sponge cake to shaping, frosting, and decorating Hello Kitty’s signature face. You’ll learn how to work with fondant, buttercream, and food coloring to bring this beloved Sanrio character to life. Plus, we’ll share expert tips and common mistakes to avoid, ensuring your cake turns out flawless.
By the end of this tutorial, you’ll have a beautifully crafted Hello Kitty cake that’s not only Instagram-worthy but also deliciously moist and flavorful. So, let’s get started on this fun and creative baking journey!
Ingredients and Tools You’ll Need
Before you start baking your Hello Kitty cake, it’s important to gather all the necessary ingredients and tools. Having everything prepared in advance will make the process smoother and more enjoyable. Below, we’ll go over the essential cake ingredients, must-have baking tools, and fun edible decorations to help you create a truly stunning Hello Kitty cake.
Essential Ingredients for the Cake Base
A Hello Kitty cake starts with a delicious and moist cake base. While a classic vanilla sponge cake is the most popular choice, you can also experiment with other flavors like chocolate, strawberry, or even red velvet. Here’s what you’ll need:
1. Cake Base Ingredients:
- All-purpose flour or cake flour – Gives the cake a soft texture.
- Sugar – Adds sweetness and helps with caramelization.
- Eggs – Provide structure and moisture.
- Butter or oil – Ensures a rich and tender crumb.
- Milk or buttermilk – Adds moisture and enhances flavor.
- Baking powder or baking soda – Helps the cake rise.
- Vanilla extract – Enhances the flavor (or substitute with almond or strawberry extract for a twist).
2. Buttercream Frosting vs. Fondant Icing – Choosing the Best Option
When it comes to decorating your Hello Kitty cake, you’ll need to decide between buttercream frosting and fondant icing. Both have their pros and cons:
- Buttercream Frosting:
- Easier to work with for beginners.
- Has a rich, creamy taste.
- Can be piped into beautiful designs.
- Best for those who prefer a softer texture.
- Fondant Icing:
- Creates a smooth, professional look.
- Works best for sculpting and detailed decorations.
- Holds its shape well in warm conditions.
- Requires some practice but offers a clean, polished finish.
Many bakers choose to use both—buttercream as a crumb coat and fondant for the final layer.
3. Food Coloring for the Perfect Hello Kitty Look
To bring Hello Kitty’s signature design to life, you’ll need a few key food colors:
- White – For the base of Hello Kitty’s face.
- Pink – To create her iconic bow.
- Black – For outlining her eyes, whiskers, and other details.
- Yellow – For her cute little nose.
Opt for gel food coloring instead of liquid, as it provides more vibrant colors without affecting the consistency of the frosting or fondant.
Baking and Decorating Tools
To successfully bake and decorate your Hello Kitty cake, you’ll need a few essential tools. These will help you achieve clean edges, smooth finishes, and precise details.
1. Cake Mold or Template for Hello Kitty’s Shape
- You can use a Hello Kitty-shaped cake pan to get an accurate outline.
- If you don’t have a mold, you can print a Hello Kitty template, place it on a round cake, and carefully cut around it with a knife.
2. Essential Baking Tools
- Mixing bowls – For preparing the batter and frosting.
- Electric mixer or whisk – To achieve a smooth cake batter and fluffy frosting.
- Measuring cups and spoons – Ensures accuracy in ingredients.
- Cake leveler or serrated knife – For trimming cake layers evenly.
3. Decorating Tools for a Professional Look
- Piping bags and tips – Used for outlining and adding buttercream details.
- Offset spatula – Helps spread buttercream smoothly.
- Rolling pin – For rolling out fondant evenly.
- Edible marker or toothpicks – For marking facial details before piping or painting.
4. Cake Stand and Turntable for Easy Decorating
- A cake stand keeps the cake stable while decorating.
- A turntable allows for smooth icing and precise detailing.
These tools will make your decorating process much easier and give your Hello Kitty cake a flawless finish.
Edible Decorations for a Cute Finish
To make your Hello Kitty cake even more eye-catching, consider adding some edible decorations. These small details will enhance the overall look and give your cake a playful, kawaii aesthetic.
1. Pre-Made Hello Kitty Cake Toppers
- If you’re short on time or want a foolproof option, ready-made Hello Kitty cake toppers are a great choice.
- You can find them in sugar paste, edible prints, or plastic versions that sit on top of the cake.
2. Edible Pearls, Sprinkles, and Bows for Extra Charm
- Edible pearls can be used to outline Hello Kitty’s face or decorate the edges of the cake.
- Pink sprinkles or sanding sugar add a sparkly, magical touch.
- Fondant bows can be handmade to match Hello Kitty’s signature look.
For an extra wow factor, you can also add:
- Gold or silver dust for shimmer.
- Mini heart-shaped candies for a playful effect.
- Whipped cream accents for a soft and fluffy feel.
Final Thoughts on Ingredients and Tools
With the right ingredients, tools, and decorations, your Hello Kitty cake will turn out beautifully! Now that you have everything ready, it’s time to move on to the fun part—baking and decorating the cake step by step.
How to Bake the Perfect Hello Kitty Cake
Creating a perfect Hello Kitty cake starts with a solid foundation—the cake itself. The following steps will guide you through the process of preparing the cake batter, shaping it into Hello Kitty’s face, and applying the first layer of frosting. These steps are crucial for achieving a professional-looking and delicious result.
Preparing the Cake Batter
The key to a light and fluffy vanilla sponge cake lies in using the right techniques when mixing the ingredients. Here’s a step-by-step guide:
Step-by-Step Guide to Making a Light and Fluffy Vanilla Sponge
- Preheat your oven to 350°F (175°C) and grease your cake pans. If using a Hello Kitty cake mold, make sure it’s well-greased to avoid sticking.
- Mix dry ingredients: In a medium bowl, sift together 1 ½ cups of all-purpose flour, 1 tsp baking powder, and a pinch of salt. This ensures the flour is light and free of lumps.
- Beat wet ingredients: In a large bowl, cream together ½ cup of softened butter and 1 cup of sugar until light and fluffy. Add 4 eggs, one at a time, mixing well after each addition. Stir in 1 tsp of vanilla extract.
- Combine wet and dry ingredients: Gradually fold in the dry ingredients, alternating with ½ cup of milk or buttermilk. Be careful not to overmix; just combine until smooth.
- Prepare the batter for baking: Pour the batter into the prepared cake mold or pans, spreading it out evenly. If using a template, pour enough batter to cover the bottom before baking.
Tips for Achieving an Evenly Baked Cake
- Level your pans by spreading the batter evenly across the surface. This will help it bake uniformly.
- Bake at the right temperature and don’t open the oven door too often, as this can cause the cake to sink. Bake for 25-30 minutes or until a toothpick inserted into the center comes out clean.
- Let the cake cool completely before moving to the next steps. If it’s too warm, frosting can melt or slide off.
Shaping the Cake into Hello Kitty’s Face
Now that your cake is ready, it’s time to shape it into Hello Kitty’s iconic face. Whether you’re using a Hello Kitty cake mold or a template, here are the steps:
How to Use a Template or Cake Mold for Precision
- If you’re using a Hello Kitty cake pan, simply pour your batter into the pan, ensuring it’s level. Follow the baking instructions specific to the pan for perfect results.
- If you don’t have a mold, use a Hello Kitty template: Print out an image of Hello Kitty’s face, place it on top of the cooled cake, and carefully cut around the edges with a sharp knife. This will give you an exact shape.
Carving Tips for a Smooth and Even Shape
- Trim the edges carefully to create a smooth contour. Work slowly, cutting a little at a time.
- If the cake has any domed top, level it off using a serrated knife or cake leveler to make it flat and even. This ensures that the face and frosting sit evenly.
- Smooth out rough edges by gently pressing down with the back of a spoon or an offset spatula, which will help maintain the roundness of Hello Kitty’s face.
Applying the First Layer of Frosting
Once your cake is shaped, it’s time to apply the frosting. This is where the base layer of frosting, also known as the crumb coat, comes in.
Crumb-Coating Technique for a Smooth Base
- Chill the cake for about 15-30 minutes to firm it up before frosting. This helps prevent crumbs from mixing into your frosting.
- Apply a thin layer of frosting (buttercream or fondant) to seal in the crumbs. Don’t worry about getting it perfect at this stage; the crumb coat should be a light, smooth base layer.
- Refrigerate the cake for another 15-30 minutes after applying the crumb coat. This helps the frosting set and makes it easier to apply the final layer.
Choosing Between Buttercream and Fondant
- Buttercream: A rich, creamy frosting that pairs perfectly with the soft texture of sponge cake. It’s easy to work with and gives a homemade feel to the cake.
- Fondant: If you want a flawless, smooth surface, fondant is the way to go. It provides a sleek, professional finish but requires more skill to apply.
Final Thoughts on Baking the Perfect Hello Kitty Cake
By following these steps, you’ll have a fluffy, evenly baked cake ready for Hello Kitty’s face to come to life. The next step is decorating the cake to perfection. Whether you opt for buttercream or fondant, the crumb coat will ensure your frosting sticks well and that your Hello Kitty cake looks sleek and adorable.
Decorating Your Hello Kitty Cake Like a Pro
Once your Hello Kitty cake is baked and crumb-coated, it’s time to bring it to life with beautiful decorations. With a few essential techniques and a little creativity, you can transform your cake into an eye-catching, professional-looking masterpiece. This section will guide you through the steps to create Hello Kitty’s signature look, add final touches, and make your cake even more stunning.
Creating the Signature Hello Kitty Look
Hello Kitty’s cute, simple face is the centerpiece of the cake. Here’s how to achieve her iconic appearance:
How to Cover the Cake with White Fondant Evenly
- Roll out your fondant: Lightly dust your work surface with powdered sugar or cornstarch. Roll out white fondant to about 1/8 inch thick, ensuring it’s large enough to cover the entire cake.
- Apply the fondant: Gently lift the rolled fondant using a rolling pin and drape it over the cake. Smooth it down with your hands, then use an offset spatula or fondant smoother to get rid of air bubbles and create a flawless surface.
- Trim excess fondant: Cut off any excess fondant from the bottom of the cake using a sharp knife or pizza cutter. The edges should be neat, but don’t worry if there are slight imperfections; these can be fixed later with piping or decorative details.
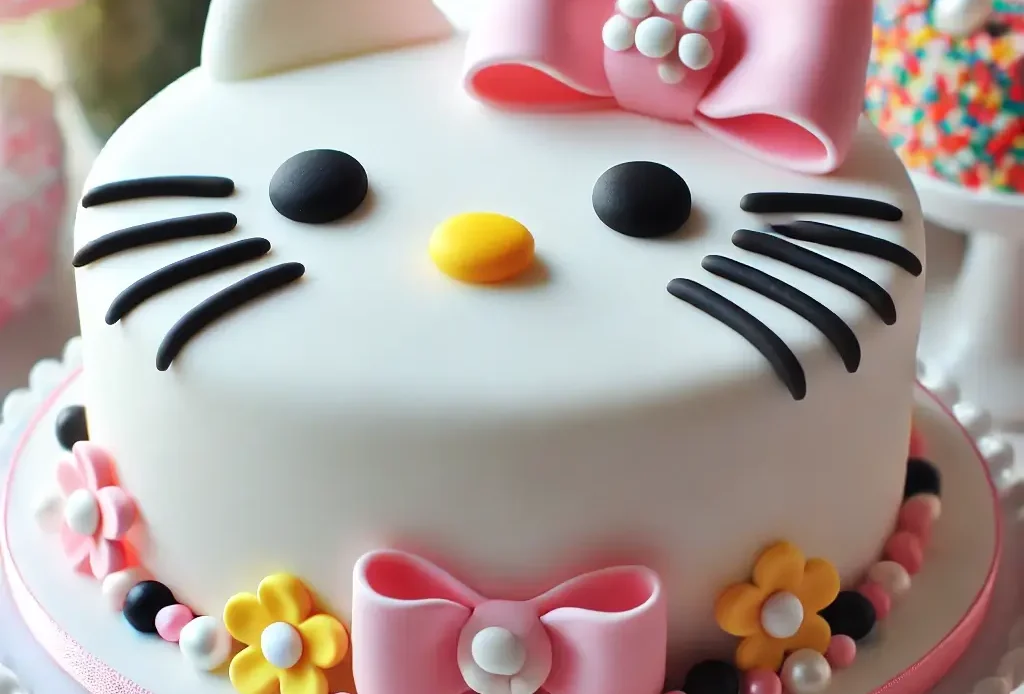
Making Hello Kitty’s Facial Features Using Food-Safe Colors
- Create the eyes, whiskers, and nose:
- Roll out small pieces of black fondant for the eyes and whiskers.
- Use yellow fondant for her nose. For the eyes, use a circle cutter to make uniform shapes, or mold them by hand.
- Attach the pieces to the cake with a little water or edible glue.
- Position the eyes and whiskers:
- Place the eyes slightly above the middle of the cake, making sure they are symmetrical.
- For the whiskers, roll thin strands of black fondant and attach them in three spots on each side of the face.
- Create the mouth: Using a black food-safe marker or thin black icing, carefully pipe Hello Kitty’s smile below her nose.
Shaping the Bow with Pink Fondant
- Roll out pink fondant to create Hello Kitty’s signature bow. Start by rolling a small piece into a ball and flattening it slightly. Then, form two small ovals and attach them in the center to create the bow’s loops.
- Form the bow’s knot by rolling a thin strip of pink fondant into a small log and attaching it to the center of the two loops.
- Place the bow on top of the cake near the top-left corner of Hello Kitty’s face. Make sure it sits securely and is centered for maximum impact.
Adding Final Details for a Stunning Finish
Now that you’ve nailed the basic design, let’s add some final touches to make your Hello Kitty cake stand out. These extra details will give your cake a polished, professional look.
Using Piping Techniques for Clean Lines and Borders
- Piping buttercream around the edges of the cake will add a decorative border. Use a star tip to create a ruffled, textured finish along the base or top.
- For clean lines, use a round piping tip to outline the cake’s features, like the eyes, nose, and whiskers. You can also add extra details like a border around the bow.
- Practice different piping techniques to add dimension and texture to your Hello Kitty cake. For example, you could add little rosettes along the sides or top edges of the cake.
Placing Edible Decorations Like Pearls and Sprinkles for Extra Flair
- Edible pearls or sprinkles can be used to outline the bow or as a decorative trim around the base of the cake.
- Colorful sprinkles (such as pink or white) can be sprinkled over the top of the cake for a subtle but charming touch.
- For a glamorous effect, place edible gold or silver pearls around the cake or bow to give it a little sparkle.
Optional: Airbrushing or Dusting for a Polished Look
- If you want to add a subtle shimmer to your cake, consider airbrushing with edible luster dust or using a dusting brush to apply a light coating of gold, silver, or pearl dust. This will give your Hello Kitty cake a high-end, polished appearance.
- Use a fine dusting to highlight the bow or edges, creating depth and dimension. Be careful not to overdo it; a light touch will provide the most effective result.
Final Thoughts on Decorating Your Hello Kitty Cake
By following these decorating steps, you’ll be able to create a Hello Kitty cake that’s as cute as it is impressive. Whether you opt for fondant or buttercream, the key to a professional-looking cake is in the details—clean lines, neat edges, and finishing touches like sprinkles and edible pearls. With a little practice and patience, you’ll have a beautifully decorated cake ready to wow your guests!
Look at this
Check out these recipes
Pro Tips and Common Mistakes to Avoid
Making a Hello Kitty cake can be a fun and rewarding experience, but there are a few things you need to know to ensure the process goes smoothly. In this section, we’ll share some expert tips for creating a flawless cake, as well as common mistakes to avoid and how to fix them. These insights will help you create a picture-perfect Hello Kitty cake without any headaches.
Expert Tips for a Flawless Cake
Achieving a flawless Hello Kitty cake requires precision, the right techniques, and a little bit of know-how. These expert tips will help you ensure that your cake looks and tastes amazing:
How to Keep Fondant from Cracking
Fondant is a great material for achieving a smooth, professional finish, but it can crack if not handled properly. Here’s how to avoid cracks:
- Knead the fondant well to soften it and make it pliable. If it’s too stiff, it may crack when you roll it out or apply it to the cake.
- Use a small amount of cornstarch or powdered sugar to dust your work surface, but don’t overdo it—too much can cause the fondant to dry out.
- Roll out fondant in small sections to avoid stretching it too thin. If you’re using fondant to cover the entire cake, work in manageable portions to ensure the fondant stays smooth and flexible.
- Store fondant properly: Keep any leftover fondant covered with plastic wrap and in an airtight container to prevent it from drying out.
Best Ways to Store and Transport the Cake
- Store the cake in a cool, dry place. Avoid refrigerating the cake unless necessary, as moisture can cause the fondant to soften and lose its texture.
- Use a sturdy cake box for transportation. For added security, place the cake on a cake board or cake circle to prevent it from shifting.
- Consider using a cake carrier if you’re transporting the cake over a long distance to protect it from bumps or damage.
- If you’re transporting a large cake, consider removing the decorations (like the bow) and placing them separately until you arrive at your destination. This will prevent them from getting damaged in transit.
Common Mistakes and How to Fix Them
Even experienced bakers make mistakes from time to time. Here are some of the most common mistakes when making a Hello Kitty cake and how to avoid or fix them:
Fondant Tearing or Air Bubbles – How to Fix It
- Tearing: If your fondant starts to tear while covering the cake, it’s likely too dry or stretched too thin. To fix it:
- Moisten the fondant slightly with a little water using a paintbrush, then gently press the edges together to seal the tear.
- You can also patch the tear with a small piece of fresh fondant and smooth it over the area.
- Air Bubbles: Air bubbles can form under the fondant, causing unsightly lumps. To avoid this:
- Smooth the fondant carefully as you apply it to the cake, starting from the center and working your way outwards.
- Use a pin or needle to prick small air bubbles, then gently smooth the surface again.
Cake Collapsing – Tips for Stability
- Cake collapse is usually caused by uneven batter distribution or insufficient support. To prevent this:
- Ensure your cake layers are even by leveling them with a serrated knife or cake leveler.
- Support tall or multi-tiered cakes with dowels or cake supports to prevent the weight from causing the cake to collapse.
- When stacking multiple layers, make sure the bottom layer is fully cooled and solid before adding more weight on top.
- For a more stable structure, apply a crumb coat before the final layer of frosting or fondant, and allow it to set in the fridge to provide additional stability.
Color Bleeding in Decorations – Preventing Mishaps
- Color bleeding happens when the colors in fondant or icing mix together and cause an undesirable effect. To avoid this:
- Allow each color to dry completely before adding the next. This prevents wet decorations from mixing with other colors and causing bleeding.
- If you’re using edible food markers, be mindful of moisture and avoid placing them on areas that may get damp.
- Use gel food coloring rather than liquid food coloring, as it’s thicker and less likely to bleed into other decorations.
- For fondant details, you can also dust the areas with a light coating of cornstarch to absorb any excess moisture.
Final Thoughts on Pro Tips and Mistakes to Avoid
Creating a Hello Kitty cake is a fun and rewarding project, and these tips will help you avoid the most common pitfalls. By following these expert suggestions and knowing how to fix mistakes as they arise, you’ll ensure your cake turns out beautifully every time. So, keep your fondant smooth, your cake stable, and your decorations neat, and you’ll be a Hello Kitty cake pro in no time!
Serving and Storing Your Hello Kitty Cake
After all your hard work decorating, it’s time to serve your Hello Kitty cake and enjoy the delicious results! Whether you’re hosting a party or saving some cake for later, knowing how to cut and store it properly will keep your cake looking great and tasting fresh. In this section, we’ll cover the best ways to cut and serve your cake, as well as how to store any leftovers so that your fondant decorations stay intact.
Best Ways to Cut and Serve
Cutting your Hello Kitty cake without ruining the design takes a little finesse, but it’s easy with the right techniques. Here’s how to slice the cake cleanly while preserving the beauty of your creation:
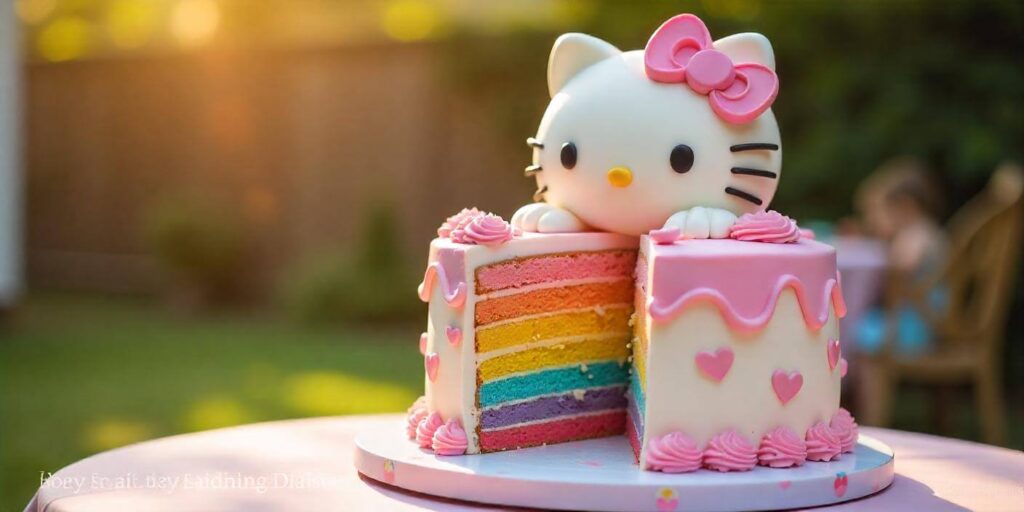
How to Slice the Cake Cleanly Without Ruining the Design
- Use a serrated knife for the cleanest slices. A sharp serrated knife will help you cut through the cake without disturbing the fondant. Make sure the knife is clean before every slice to keep the edges neat.
- Wipe the knife after each slice: After each cut, wipe the knife with a damp cloth to remove any crumbs or frosting, ensuring each slice is smooth and clean.
- Cut in small sections: Instead of cutting a large portion at once, consider cutting smaller slices that are easier to handle and will keep the design intact.
Portioning the Cake for Different Party Sizes
- For a smaller party, you can slice the cake into wedge-shaped pieces, ensuring each guest gets a fair portion without compromising the appearance.
- For a larger party, you can cut the cake into squares or smaller wedges, ensuring each piece has a good amount of the Hello Kitty face design on it.
- If your cake is a multi-tiered one, be sure to serve the bottom tier first. When cutting multi-tiered cakes, remove the top tier to serve it separately, as it can make cutting easier.
Storing Leftovers Properly
If there are any leftovers from your Hello Kitty cake, it’s important to store them correctly so they stay fresh and the fondant decorations remain in perfect condition. Here’s how to keep your cake in top shape:
Refrigerating vs. Freezing the Cake
- Refrigerating: If you plan to eat the cake within a few days, it’s best to store it in the fridge. Place the cake in an airtight container or cover it loosely with plastic wrap to prevent it from drying out.
- Tip: If the cake is covered in fondant, you should refrigerate it for no more than 2-3 days, as the fondant can start to soften or lose its texture after that time.
- Freezing: For longer storage, you can freeze the cake. Slice the cake into portions before freezing, and wrap each slice tightly in plastic wrap followed by aluminum foil.
- When you’re ready to eat, thaw the cake in the refrigerator to avoid condensation forming on the fondant. It’s best to let the cake come to room temperature before serving.
How to Keep Fondant Decorations from Getting Sticky
Fondant is prone to becoming sticky or losing its texture if exposed to moisture, so storing it correctly is crucial:
- Store in a cool, dry place away from direct sunlight and humidity.
- If the cake is stored in the fridge, make sure to cover it properly with plastic wrap or an airtight container. The key is to keep moisture from touching the fondant, as this can cause it to become soft or sticky.
- If you notice the fondant starting to soften, you can dust it lightly with cornstarch to restore its texture. Be gentle when handling the cake to avoid damaging the decorations.
Final Thoughts on Serving and Storing Your Hello Kitty Cake
By following these simple tips, you can ensure that your Hello Kitty cake remains as beautiful as the day you decorated it, even after slicing and storing. Whether you’re cutting it for a party or saving leftovers for later, keeping your cake fresh and its fondant decorations in perfect condition is easy with the right care. Enjoy every bite, and your cake will stay delicious and stunning!
Mastering the Art of Making a Perfect Hello Kitty Cake
Creating a Hello Kitty cake can be an incredibly fun and rewarding experience, and by following these tips and steps, you’ll be able to achieve a beautifully decorated cake that will impress any guest. From gathering the right ingredients and tools to perfecting the decoration and ensuring the final result stays fresh, you now have all the knowledge you need to bring Hello Kitty’s adorable face to life.
Remember, the key to a perfect Hello Kitty cake lies in patience, attention to detail, and the use of high-quality materials like fondant and food coloring. Whether you’re making it for a special occasion or just for fun, the process is all about creativity and having fun while decorating. And don’t forget, it’s okay to make mistakes—learning how to fix them is just part of the experience.
Once your cake is complete, serving it with care ensures the design stays intact, and storing it properly will keep your creation fresh for longer. Whether you’re slicing it for a party or saving leftovers, your Hello Kitty cake will be a hit, and it will look as stunning as it tastes!
By mastering these steps and tips, you’ll be well on your way to becoming a cake-decorating pro, and the next time you make a Hello Kitty cake, you’ll feel more confident and capable in the kitchen. So grab your rolling pin, your fondant, and let your creativity shine—because the perfect Hello Kitty cake is just a few steps away!
