
Spring roll wrapper are the foundation of many delicious Asian dishes, from crispy fried spring rolls to fresh Vietnamese summer rolls. These thin, delicate sheets encase a variety of flavorful fillings, making them a versatile ingredient in both traditional and modern cuisine. While store-bought options are widely available, learning how to make spring roll wrappers at home allows you to achieve the perfect texture, control the ingredients, and customize them to your preferences.
Homemade spring roll wrappers offer several advantages—they are fresher, free from preservatives, and can be tailored to dietary needs such as gluten-free or whole wheat variations. Whether you’re aiming for a soft and pliable wrapper for fresh spring rolls or a crisp, golden shell for fried versions, mastering the art of homemade wrappers is easier than you think.
In this guide, you’ll learn everything about making spring roll wrappers from scratch, including the right ingredients, step-by-step instructions, and expert tips to ensure perfect results. By the end of this post, you’ll be able to create delicate, thin, and flexible wrappers that elevate your homemade spring rolls to restaurant-quality perfection. Let’s get started!
What is a Spring Roll Wrapper?
A spring roll wrapper is a thin, flexible sheet of dough used to encase various fillings, commonly found in Asian cuisine. These wrappers serve as the base for both fresh and fried spring rolls, offering a delicate yet sturdy structure to hold ingredients together. While they may look similar to other wrappers like rice paper, their composition and usage vary significantly depending on the type of spring roll being prepared.
Spring Roll Wrapper vs. Rice Paper – What’s the Difference?
Many people confuse spring roll wrappers with rice paper, but they are distinct in texture, ingredients, and application:
| Feature | Spring Roll Wrapper | Rice Paper (Bánh Tráng) |
|---|---|---|
| Main Ingredients | Flour (wheat or rice), water, salt, sometimes cornstarch | Rice flour, tapioca starch, water, salt |
| Texture | Soft and pliable when raw; crispy when fried | Thin, slightly stiff when dry; soft and chewy when moistened |
| Preparation | Usually cooked before use (pan-cooked or baked) | Soaked in water before use |
| Best for | Fried spring rolls (Chinese, Thai, Filipino lumpia) | Fresh spring rolls (Vietnamese gỏi cuốn) |
While spring roll wrappers are ideal for deep-frying, producing a crispy and golden texture, rice paper wrappers are better suited for fresh, uncooked rolls due to their soft and chewy consistency.
Types of Spring Roll Wrappers Used in Asian Cuisine
Spring roll wrappers vary across different Asian cuisines, with slight differences in ingredients, thickness, and preparation methods:
- Chinese Spring Roll Wrappers
- Composed of wheat flour and water, and occasionally includes eggs.
- Thin and pliable, designed for deep frying.
- Used in Cantonese-style crispy spring rolls filled with vegetables, pork, or shrimp.
- Vietnamese Spring Roll Wrappers (Bánh Tráng)
- Made from rice flour and tapioca starch.
- Used for fresh gỏi cuốn (Vietnamese fresh spring rolls) or fried chả giò (Vietnamese egg rolls).
- Thai Spring Roll Wrappers
- Similar to Chinese wrappers but often slightly thinner.
- Used in Thai-style spring rolls (Poh Pia Tod), which are deep-fried and filled with glass noodles, vegetables, and meat.
Store-Bought vs. Homemade Spring Roll Wrappers
Choosing between store-bought and homemade spring roll wrappers depends on convenience, quality, and personal preference.
Store-Bought Wrappers
✅ Convenient and time-saving.
✅ Available in different sizes and types.
❌ May contain preservatives or additives.
❌ Can be dry and prone to cracking if not stored properly.
Homemade Wrappers
✅ Fresher, without preservatives.
✅ Customizable texture and thickness.
✅ More budget-friendly in the long run.
❌ Requires time and effort to prepare.
While store-bought wrappers are a great option for quick meals, homemade spring roll wrappers allow for a more authentic and customizable experience. Plus, making them from scratch ensures you get the perfect texture for crispy fried rolls or soft, flexible fresh rolls.
Now that you understand what spring roll wrappers are and how they differ across cuisines, let’s explore how to make them from scratch!
Essential Ingredients and Tools for Homemade Spring Roll Wrappers
Making homemade spring roll wrappers requires a few key ingredients and tools that will determine the texture, flexibility, and overall success of your wrappers. Understanding the role of each component ensures you can achieve the perfect result every time. Let’s break down what you’ll need:
Choosing the Right Flour – All-Purpose vs. Rice Flour
The flour you use in your spring roll wrapper dough plays a major role in its texture and flexibility. Here’s how all-purpose flour and rice flour affect your wrappers:
- All-Purpose Flour:
- Texture: This flour gives the wrapper a soft, smooth texture. It creates a more elastic dough that’s easy to roll thin and makes the wrappers pliable when fresh.
- Use: Often used in Chinese-style spring roll wrappers that are fried to crispy perfection. All-purpose flour helps the wrapper maintain structure while getting crispy during frying.
- Rice Flour:
- Texture: Rice flour produces a slightly denser and more brittle wrapper. However, it can create a softer, more delicate wrapper when combined with other ingredients like tapioca starch.
- Use: Commonly used for Vietnamese spring roll wrappers (Bánh Tráng), which are ideal for fresh rolls. Rice flour produces a translucent, soft texture that becomes chewy when moistened.
Other Key Ingredients (Cornstarch, Water, Tapioca Starch, Salt)
These ingredients are essential to achieving the perfect spring roll wrapper dough:
- Cornstarch:
- Role: Cornstarch helps give the wrapper a smooth and slightly crispy texture once fried. It also contributes to the dough’s elasticity and prevents it from becoming too brittle.
- Tip: Use sparingly, as too much can make the dough too soft and difficult to work with.
- Water:
- Role: Water is the binding agent that brings the dry ingredients together. It’s essential for achieving the right dough consistency.
- Tip: Gradually add water until the dough reaches a smooth, slightly sticky texture that’s easy to knead and roll out.
- Tapioca Starch:
- Role: Tapioca starch is often added to increase the dough’s stretchiness and pliability, making the wrappers more flexible. It’s particularly useful in Vietnamese-style wrappers and helps them stay soft without cracking.
- Tip: Tapioca starch can also give the wrapper a slightly chewy texture, which is desirable in fresh spring rolls.
- Salt:
- Role: Salt enhances the overall flavor of the wrapper, ensuring it’s not bland. It also strengthens the dough, making it easier to work with.
- Tip: Add a pinch of salt to balance the flavors and make the wrappers more savory.
Must-Have Kitchen Tools for Perfect Wrappers
To successfully make your spring roll wrappers, you’ll need a few basic kitchen tools. Here’s a list of must-haves:
- Rolling Pin:
- Role: A rolling pin is crucial for rolling out the dough evenly to the desired thinness. To avoid sticking, it’s helpful to dust the surface lightly with cornstarch or flour.
- Tip: A marble or wooden rolling pin works best for even pressure and uniform thickness.
- Non-Stick Pan or Flat Griddle:
- Role: A non-stick pan or flat griddle is perfect for cooking the wrappers. The smooth surface helps prevent the dough from sticking while also ensuring it cooks evenly.
- Tip: Use low to medium heat to avoid burning the wrappers. Cooking each wrapper for about 30-60 seconds on each side will result in the ideal soft texture.
- Brush:
- Role: A pastry brush is used to lightly coat the surface of your wrapper with a thin layer of water or oil, especially when rolling out or stacking multiple wrappers. This prevents them from sticking and helps them retain their flexibility.
- Tip: Use a soft-bristle brush to avoid tearing the delicate dough.
- Dough Scraper:
- Role: A dough scraper is a handy tool for cutting and shaping the wrappers. It helps you easily divide the dough into portions and handle delicate sheets of dough.
- Tip: A plastic or metal dough scraper with a flat edge works well for cleaning the work surface and ensuring the dough is shaped evenly.
With these ingredients and tools, you’re well on your way to making perfect spring roll wrappers every time. The right combination of flour, starches, and tools is key to achieving that delicate balance between flexibility, crispiness, and flavor. Let’s move on to the step-by-step process of creating your own homemade wrappers!
Step-by-Step Guide to Making Spring Roll Wrappers at Home
Making spring roll wrappers from scratch is a fun and rewarding process. With the right ingredients, tools, and techniques, you’ll soon be able to craft delicate, thin wrappers that elevate your homemade spring rolls. Presented here is a structured guide to aid you in getting started:
Mixing and Preparing the Dough
The key to achieving the perfect spring roll wrapper lies in the dough consistency. Getting the right flour-to-water ratio is essential for a smooth, elastic dough that rolls out evenly. Here’s how to prepare the dough:
- Combine the Dry Ingredients:
- In a large bowl, mix your chosen flour (all-purpose flour or rice flour) with cornstarch and a pinch of salt. This will create the base for your dough.
- Gradually Add Water:
- Slowly pour in room temperature water, a little at a time, while stirring the mixture with a spoon or your hands. Continue to mix until a dough starts to take shape.
- The goal is to achieve a dough that’s not too sticky, but still soft and pliable. If it feels too dry, add more water, a teaspoon at a time.
- Knead the Dough:
- Move the dough onto a floured surface and knead it for approximately 5 to 7 minutes. The resulting dough should be smooth, soft, and exhibit a slight elasticity.
- If it’s too sticky, sprinkle a little extra cornstarch, but be careful not to add too much or it can become too dry.
- Rest the Dough:
- Once kneaded, cover the dough with a damp cloth or plastic wrap and let it rest for at least 30 minutes. Allowing the dough to rest aids in relaxing the gluten, which facilitates easier rolling.
Rolling and Cooking the Wrappers
Rolling the dough into thin, even sheets and cooking them is a delicate process. Here’s how to achieve the perfect spring roll wrappers:
- Divide and Roll Out the Dough:
- Following the resting phase of the dough, partition it into small, identical portions. Roll each piece into a ball (about the size of a small marble) and flatten it with your hands.
- Using a rolling pin, roll each piece into a thin, round sheet, about 6-8 inches in diameter. Aim for an even thickness; too thick, and the wrapper will be chewy; too thin, and it might tear.
- If necessary, dust the surface with cornstarch or flour to prevent sticking.
- Cook the Wrappers:
- Set a non-stick pan or griddle on medium heat to warm it up. Once hot, place the rolled-out wrapper onto the pan.
- Cook the wrapper for about 30 seconds to 1 minute on each side until it starts to look translucent and no longer appears doughy. Do not overcook—it should remain soft, not crispy.
- Flip carefully using a spatula or your hands, ensuring the wrapper doesn’t tear.
- Stack and Cool:
- After cooking, stack the wrappers on a plate, separating each one with a sheet of wax paper or parchment paper. Give them a moment to cool off before applying.
Tips for Preventing Wrappers from Tearing
It’s easy for spring roll wrappers to tear, especially if the dough is too thin or too dry. This section outlines common blunders and offers guidance on how to circumvent them:
- Not Enough Moisture in the Dough:
- Verify that your dough is soft and adaptable, and not too dry in consistency. If the dough cracks when rolling, add a bit more water and knead until smooth.
- Rolling Too Thin:
- While the goal is to make the wrappers as thin as possible, overly thin dough can tear easily. Aim for a delicate yet durable thickness that will hold up during cooking and rolling.
- Overcooking the Wrappers:
- Cooking the wrappers for too long will make them brittle and prone to cracking. Watch carefully for the moment they turn slightly translucent and stop cooking immediately.
- Not Using Enough Cornstarch or Flour:
- Always dust your rolling surface with a light coating of cornstarch or flour to prevent the dough from sticking.
- Stacking the Wrappers Without Separation:
- When stacking your wrappers, always place a piece of parchment paper between each one. This keeps them from sticking together and makes it easier to peel them apart without tearing.
Storing and Keeping Wrappers Fresh
If you’re not using your spring roll wrappers immediately, it’s important to store them properly to maintain their freshness:
- Short-Term Storage:
- If you plan to use the wrappers within a few hours, simply cover them with a damp cloth or plastic wrap and leave them at room temperature.
- For longer storage, stack the wrappers with parchment paper between each layer and place them in an airtight container or zip-lock bag.
- Long-Term Storage:
- To store wrappers for longer periods, wrap them tightly in plastic wrap, then place them in a zip-lock bag or airtight container. You can keep them frozen for as long as thirty days.
- When ready to use, let them thaw at room temperature for about 10 minutes before using.
By following these steps and tips, you’ll be able to make perfect spring roll wrappers that are both flexible and durable, ready to hold any delicious filling you choose. Now you’re ready to roll!
Methods for Using Spring Roll Wrappers in Appetizing Culinary Creations

Once you’ve mastered the art of making homemade spring roll wrappers, the next step is to use them in a variety of mouthwatering dishes. Whether you’re looking to create crispy fried spring rolls, fresh Vietnamese rolls, or even get creative with different fillings, spring roll wrappers are incredibly versatile. Here’s how you can use them to create delicious, crowd-pleasing recipes:
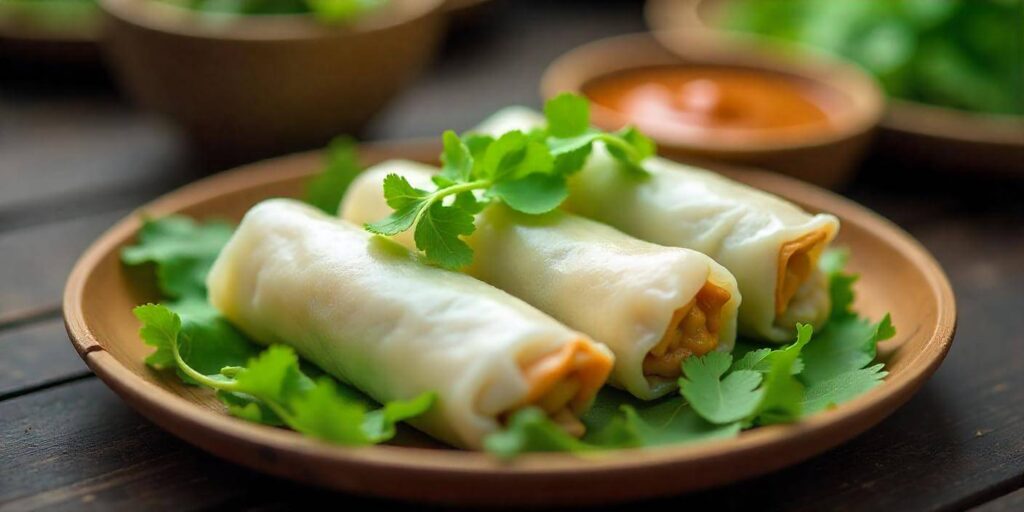
Classic Fried Spring Rolls Recipe
Fried spring rolls are a timeless favorite, known for their crispy exterior and flavorful fillings. Below are the steps to craft classic fried spring rolls featuring your own homemade wrappers:
- Prepare the Filling:
- For a classic filling, you can use a combination of cooked ground pork or chicken, shredded cabbage, carrots, mushrooms, and onions. Add seasonings like soy sauce, garlic, and ginger to taste.
- You can also make vegetarian versions with tofu and vegetables.
- Assemble the Spring Rolls:
- Position a spring roll wrapper on a clean, flat surface. Add approximately 2-3 tablespoons of the filling to the center of the wrapper.
- Fold the sides of the wrapper inward, then roll it tightly from the bottom to the top, sealing the edge with a small amount of water. Be careful not to overfill, as this can cause the wrapper to tear during frying.
- Heat the Oil:
- Set a deep pan or wok on medium-high heat and add oil to warm it. You’ll need enough oil to fully submerge the spring rolls. The oil temperature should be around 350°F (175°C) for a crispy, golden result.
- Fry the Spring Rolls:
- Carefully lower the spring rolls into the hot oil, a few at a time. Fry for 3-5 minutes, turning occasionally until all sides are golden and crispy.
- Extract the spring rolls from the oil and set them on a plate covered with paper towels to absorb any remaining oil.
- Serve and Enjoy:
- Serve your crispy spring rolls with dipping sauces like soy sauce, hoisin sauce, or sweet chili sauce.
Tips for Extra Crispiness:
- Make sure the oil is hot enough to create a crispy exterior without overcooking the inside.
- Don’t overcrowd the pan, as this can lower the oil temperature and result in soggy rolls.
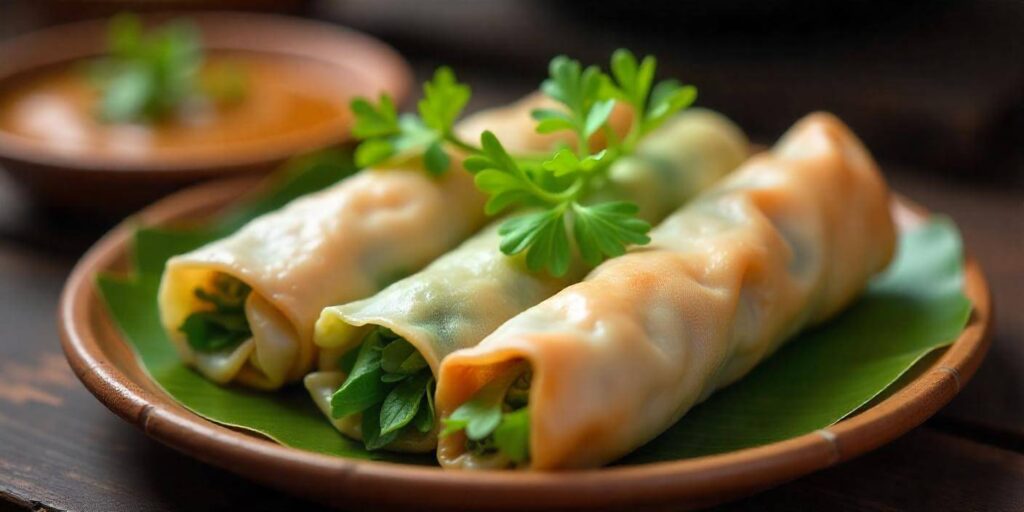
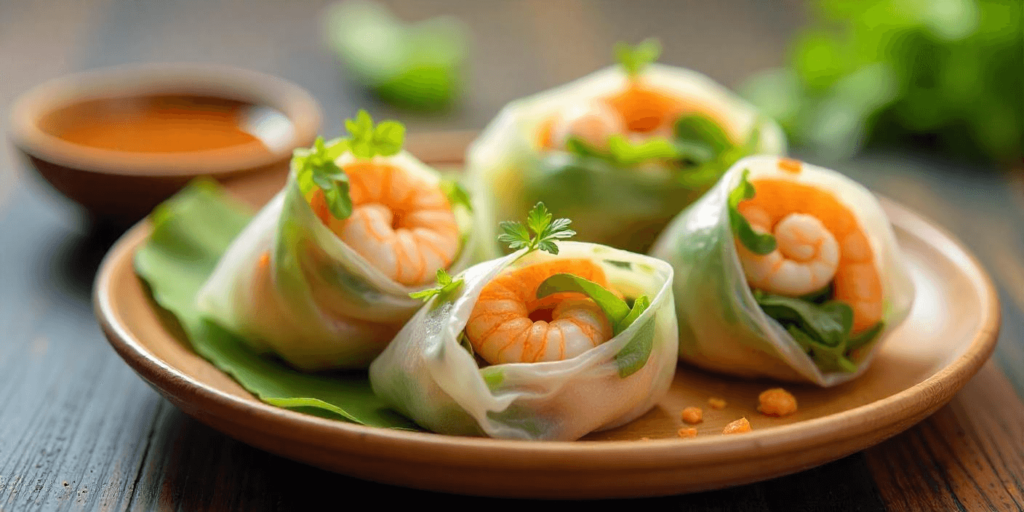
Fresh Vietnamese Spring Rolls (Gỏi Cuốn)
For a lighter, healthier option, Vietnamese Gỏi Cuốn (fresh spring rolls) use soft spring roll wrappers filled with fresh vegetables, rice vermicelli, shrimp, and herbs.
- Prepare the Fillings:
- Refer to the package instructions to properly cook the rice vermicelli noodles.
- Slice cooked shrimp in half lengthwise.
- Gather fresh herbs like cilantro, mint, and basil, and prepare lettuce and julienned vegetables like carrots, cucumber, and bell peppers.
- Soak the Spring Roll Wrappers:
- Fill a shallow dish with warm water. Soak each spring roll wrapper in water for 5 to 10 seconds until it is soft and pliable. Take care not to leave it in the water for too long; just enough to achieve the desired softness.
- Assemble the Fresh Rolls:
- Spread the softened wrapper out on a clean surface. Add a few leaves of lettuce to the bottom third of the wrapper. Add a small portion of rice noodles, shrimp, and vegetables.
- Add a few sprigs of herbs on top for extra flavor.
- Roll up the wrapper tightly from the bottom, folding in the sides as you go to create a neat cylinder.
- Serve with Dipping Sauce:
- Fresh spring rolls are often served with a flavorful dipping sauce like hoisin-peanut sauce or nuoc cham (Vietnamese dipping sauce) made from fish sauce, sugar, lime juice, and chili.
Tip for Wrapping:
- Be careful not to overfill the rolls, as they can be difficult to wrap tightly. The key is to keep the rolls loose enough to prevent tearing the wrapper while still allowing all the ingredients to fit.
Creative Uses Beyond Spring Rolls
Don’t limit yourself to just traditional spring rolls! There are plenty of creative ways to use your homemade spring roll wrappers in other dishes:
- Wrapping Dumplings:
- Use spring roll wrappers to make dumplings or potstickers. Fill with ground meat, vegetables, and seasonings, then fold and seal. Pan-fry or steam them for a delightful treat.
- You can also use wrappers for shumai-style dumplings, just make sure to steam them properly to keep the wrapper tender.
- Making Samosas:
- Spring roll wrappers can also serve as a perfect base for samosas. Simply cut the wrappers into smaller pieces, fill with spiced potatoes, peas, and lentils, then fold them into triangles. Fry or bake for crispy, savory bites.
- Using as a Tortilla Alternative:
- Get creative by using spring roll wrappers as a healthier alternative to tortillas. Fill with grilled vegetables, chicken, or fish, then roll them up into wraps for a light lunch or dinner. These can be served fresh or lightly pan-fried for extra crispiness.
Pro Tip:
- Use spring roll wrappers to make quick appetizers, like mini spring roll cups—simply press the wrapper into a muffin tin and bake for a few minutes to create crispy cups that can hold your favorite fillings.
With these delicious recipes and creative ideas, your spring roll wrappers will become a versatile ingredient in your kitchen. Whether you’re making classic fried spring rolls, fresh Vietnamese rolls, or exploring new flavors, the possibilities are endless!
Look at this
Check out these recipes
FAQs and Troubleshooting Common Issues
Making spring roll wrappers can be a bit tricky if you’re new to the process, but with a little knowledge and patience, you can troubleshoot common issues to perfect your wrappers. Here are some frequently asked questions and tips to help you overcome any challenges you might face during the process:
Why Are My Wrappers Too Thick or Too Thin?
It’s common to encounter issues with the thickness of your spring roll wrappers, whether they’re too thick or too thin. Here’s how to adjust the dough consistency and rolling technique:
- Too Thick Wrappers:
- Dough Consistency: If your wrappers are coming out too thick, your dough may not be soft enough. Try adding a little more water while kneading to achieve a smoother, more elastic texture. A slightly softer dough is easier to roll thin.
- Rolling Technique: When rolling out the dough, make sure you’re applying even pressure with your rolling pin. If the dough resists, it’s probably not rested enough. Give it additional time to rest before you begin rolling.
- Tip: Dust your rolling surface and rolling pin lightly with cornstarch or flour to prevent sticking, but don’t overdo it. Too much flour can make the dough harder to roll thin.
- Too Thin Wrappers:
- Dough Handling: If your wrappers are tearing because they’re too thin, your dough might be too soft. Add a little more flour to your dough, knead it well, and try rolling it out more carefully to avoid stretching it too thin.
- Rolling Technique: Make sure you’re rolling in one direction, gently applying pressure. Rolling too quickly or aggressively can result in uneven thickness and tears.
How to Keep Spring Roll Wrappers from Drying Out?
Spring roll wrappers are delicate and can dry out quickly, especially if you’re preparing them in advance. Here’s how to prevent them from drying out and maintain their flexibility:
- Proper Moisture Control While Rolling:
- After soaking the wrappers in warm water, ensure they are not over-soaked, as they can become too soft and tear easily. Soak them only until they are just pliable.
- Work with one wrapper at a time to prevent exposure to air. If you’re stacking wrappers, separate each layer with a damp cloth or parchment paper to keep them moist.
- Cover the Wrappers:
- When working with spring roll wrappers, cover any unused wrappers with a damp cloth while you’re assembling the rolls. This helps keep them hydrated and prevents them from drying out and cracking.
- Storage Tips:
- If you’re not using the wrappers immediately, store them properly to prevent drying out. Wrap the unused wrappers tightly in plastic wrap, and place them in an airtight container or zip-lock bag to keep moisture in.
- If you’re refrigerating them, ensure the wrappers are wrapped well to avoid air exposure, which can cause them to dry out and become brittle.
Can I Make Gluten-Free Spring Roll Wrappers?
Yes, it’s definitely possible to make gluten-free spring roll wrappers, and there are several flour substitutes that work well. Here’s how to make gluten-free wrappers and what adjustments you need to make:
- Best Gluten-Free Flour Substitutes:
- Rice Flour: Rice flour is the primary flour used in gluten-free spring roll wrappers and is a great alternative to wheat flour. It provides a soft, pliable texture ideal for fresh spring rolls.
- Tapioca Starch: Tapioca starch can be added to enhance the stretchiness and flexibility of the wrappers, ensuring they don’t break or tear easily.
- Potato Starch: Another excellent option, potato starch helps create a smooth, elastic dough for gluten-free wrappers. It’s often used in combination with rice flour for better texture and pliability.
- Recipe Adjustments:
- When using gluten-free flours, the dough may require a slightly higher moisture content. Be prepared to adjust the water-to-flour ratio to ensure the dough is soft and pliable.
- Binding: Since gluten is responsible for elasticity in regular wrappers, gluten-free wrappers might be slightly more brittle. To counteract this, you can add a small amount of xanthan gum or guar gum (about 1/4 teaspoon) to the dough to improve elasticity.
- Tip for Rolling:
- Gluten-free wrappers may be more delicate, so be extra careful when rolling them out. Roll slowly and use a silicone rolling mat or parchment paper underneath to prevent sticking and tears.
With these tips, you can troubleshoot any issues and enjoy making perfect spring roll wrappers at home, whether gluten-free or traditional!
Mastering the Art of Making Spring Roll Wrappers at Home
In conclusion, learning how to make spring roll wrappers at home opens up a world of culinary possibilities. Whether you’re preparing crispy fried spring rolls, fresh Vietnamese rolls, or experimenting with creative dishes, homemade wrappers offer unmatched flavor and texture. By understanding the essential ingredients, tools, and techniques—along with troubleshooting common issues—you can easily craft perfect wrappers every time.
The beauty of homemade spring roll wrappers lies in their versatility. Once you’ve mastered the basic process, you can customize the dough to suit your personal tastes, explore gluten-free options, or use them in an array of different recipes. From the delicate art of rolling to finding the ideal filling, this simple yet rewarding skill will elevate your cooking and impress your guests.
So, the next time you’re craving spring rolls, why not make the wrappers yourself? With a little practice and the right approach, you’ll be able to create delicious, fresh, and crispy wrappers that will make every dish special. Remember, the key is patience, technique, and the joy of cooking from scratch. Happy wrapping!
More dinner recipes are available here. Don’t hesitate to check them out!