
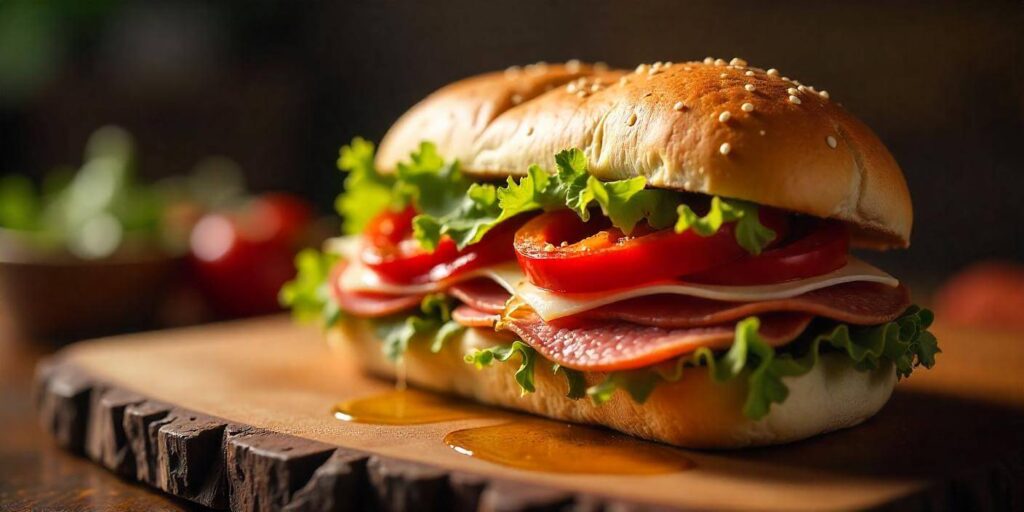
A grinder sandwich recipe is the perfect way to enjoy a hearty, flavor-packed meal that combines layers of delicious deli meats, melted cheese, crisp vegetables, and a tangy dressing—all tucked inside a freshly baked hoagie roll. This iconic sandwich, often associated with Italian-American cuisine, is known for its generous fillings and satisfying texture, making it a popular choice for lunch, dinner, or even game day gatherings.
But what exactly makes a grinder sandwich stand out from other subs or hoagies? The secret lies in the bold combination of flavors, the right choice of bread, and the perfect balance of meat, cheese, and toppings. Whether toasted to crispy perfection or served cold for a refreshing bite, a grinder sandwich delivers an unbeatable taste experience.
In this blog post, we’ll walk you through the ultimate grinder sandwich recipe, sharing step-by-step instructions, expert tips, and creative variations so you can make it like a pro. From selecting the best deli meats and cheeses to crafting the perfect sauce, you’ll learn everything needed to master this classic sandwich at home. Get ready to build the most mouthwatering grinder sandwich ever!
What is a Grinder Sandwich?
A grinder sandwich is a classic, overstuffed deli-style sandwich made with layers of meats, cheeses, fresh vegetables, and seasonings, all nestled inside a hearty hoagie roll. While it shares similarities with subs, hoagies, and heroes, the grinder sandwich stands out for its bold flavors and, often, its toasted, crunchy texture. Whether enjoyed hot or cold, this sandwich has been a staple in Italian-American cuisine for decades, offering a perfect balance of textures and flavors in every bite.
Origins of the Grinder Sandwich
The grinder sandwich originated in the Northeastern United States, particularly in New England, where it became a popular choice among Italian immigrants. The name “grinder” is believed to have come from the term used for dockyard workers and laborers in the early 20th century, who needed a hearty, filling meal to fuel their demanding workdays. The tough, crusty bread used in grinders required some “grinding” with the teeth, further solidifying the name.
While grinders are particularly popular in Connecticut, Rhode Island, and Massachusetts, similar sandwiches exist across different regions under different names:
- Submarine Sandwich (Sub) – A widely recognized term across the U.S., especially in New York and New Jersey.
- Hoagie – Popular in Philadelphia and Pennsylvania, the hoagie features similar ingredients but is often dressed with oil and vinegar.
- Hero – A New York specialty, typically stacked with meats and cheeses.
- Po’ Boy – A Louisiana version that often includes fried seafood instead of traditional deli meats.
Although the names vary, the core concept remains the same: a large, satisfying sandwich filled with meats, cheeses, and vegetables, making it a go-to meal for sandwich lovers.
What Makes a Grinder Different from Other Sandwiches?
At first glance, a grinder sandwich may seem identical to a sub or hoagie, but there are key differences that set it apart:
Grinder vs. Sub Sandwich
- A grinder is often toasted, while a sub is typically served cold (though this varies by preference).
- Grinders frequently feature a heartier, crustier roll, which holds up well to toasting and absorbs flavors beautifully.
- The term “sub” is more widely used across the U.S., whereas “grinder” remains a regional term in New England.
Key Ingredients That Define a Grinder Sandwich
A true grinder sandwich includes:
- High-quality deli meats like salami, ham, turkey, roast beef, or a combination.
- Cheese choices such as provolone, mozzarella, Swiss, or American.
- Fresh toppings like lettuce, tomatoes, onions, banana peppers, and pickles.
- Flavorful dressings such as Italian dressing, mayonnaise, mustard, or a drizzle of olive oil and vinegar.
- Hearty bread that can be toasted or grilled for added texture and taste.
While sub sandwiches and hoagies share many of these ingredients, the toasting method and bread texture are often what set grinders apart.
The Best Bread for a Grinder Sandwich
The bread is the foundation of any great grinder sandwich, and choosing the right type makes all the difference. Unlike soft sandwich bread, grinder sandwiches require sturdy, chewy bread that can hold up to multiple layers of ingredients without becoming soggy.
Best Bread Options for a Grinder Sandwich
- Hoagie Rolls – The most common choice, known for their soft interior and crusty exterior. Perfect for toasting or serving cold.
- Submarine Rolls – Similar to hoagie rolls, but slightly softer and airier, often used for classic subs and heroes.
- Baguettes – A firmer option that adds extra crunch, ideal for toasted grinders.
Toasted vs. Untoasted Grinder Sandwiches
- Toasted Grinder: Melts the cheese, crisps up the bread, and enhances flavors by blending everything together. Great for hot sandwiches.
- Untoasted Grinder: Keeps the ingredients fresh and crisp, making it a refreshing option for cold-cut lovers.
Some prefer to lightly toast only the bread before assembling the sandwich, allowing the crust to stay crisp while the inside remains soft. Others prefer fully toasted grinders, where the entire sandwich is placed in the oven until the cheese melts and the flavors combine.
Ultimately, the best grinder sandwich comes down to personal preference—but whether hot or cold, toasted or untoasted, a well-made grinder is always a delicious choice.
Ingredients for the Ultimate Grinder Sandwich

When it comes to making the ultimate grinder sandwich, selecting the right ingredients is key. From choosing the perfect deli meats to adding just the right cheeses and toppings, each component plays a role in making the sandwich a flavorful masterpiece. Below, we’ll break down the best options for each essential part of your grinder sandwich.
Choosing the Best Deli Meats
The deli meats you choose will be the star of your grinder sandwich, so selecting high-quality options is essential. Traditionally, grinders feature a variety of meats stacked together to create a layered, savory bite. Here are the most popular cold cuts to include:
- Salami – A flavorful, slightly tangy meat that adds depth and spice to the sandwich.
- Ham – A versatile choice, either honey ham or smoked, to provide a mild, sweet contrast to bolder meats.
- Turkey – A lean, light meat that offers a fresh flavor. It’s perfect for balancing out heavier options like salami and roast beef.
- Roast Beef – Rich, savory, and often tender, roast beef is a go-to for a satisfying and hearty sandwich.
- Capicola – A spicy, flavorful Italian meat often used in Italian-style grinders.
When layering meats, it’s important to think about texture and flavor. Start with a foundation of thinly sliced meats, and layer them in different directions to help the sandwich hold together and allow each bite to have a variety of flavors. The key is to balance the richness of roast beef with the spiciness of salami and the mildness of turkey—giving every bite a little something different.
Must-Have Cheeses for a Grinder
Cheese is one of the most important components of a grinder sandwich, helping to add creaminess, meltiness, and richness. The best cheeses for a grinder typically offer both flavor and meltability. Here are some of the top cheese choices for your sandwich:
- Provolone – A classic Italian cheese known for its mild, smooth flavor and great melting properties.
- Mozzarella – Soft, creamy, and mildly tangy, mozzarella adds a fresh flavor and is perfect for toasted grinders.
- Swiss Cheese – A nutty, slightly sweet cheese that adds complexity, especially when paired with ham or roast beef.
- Cheddar – While not traditional for a grinder, sharp cheddar can add a tangy punch, especially when paired with turkey or roast beef.
- American Cheese – Known for its meltability and mild flavor, this cheese is perfect for creating a smooth, gooey texture.
When choosing melting vs. non-melting cheeses, think about the texture and taste you prefer. Melting cheeses, like provolone, mozzarella, and cheddar, provide a satisfying gooey texture when toasted, while non-melting cheeses like Swiss or even a hard cheese like Parmesan can bring more of a bite without losing their shape when the sandwich is assembled.
Fresh Vegetables and Toppings
Fresh veggies are essential for adding crunch, brightness, and freshness to the sandwich, cutting through the richness of the meats and cheeses. Here are some must-have veggies and toppings:
- Lettuce – Crisp and refreshing, lettuce adds a cool crunch that contrasts perfectly with the rich meats and melted cheese.
- Tomato – A juicy, ripe tomato slice brings sweetness and moisture to balance the sandwich.
- Onions – Thinly sliced red onions or pickled onions add a sharp, tangy bite.
- Banana Peppers – These mildly spicy peppers give a subtle heat and tang that complements the flavors of the meats and cheese.
- Pickles – For an extra punch of acidity and crunch, adding pickles (dill or bread-and-butter) can elevate the sandwich.
Feel free to get creative with additional toppings like olives, cucumbers, or even roasted red peppers. Each topping should add texture and flavor without overpowering the key components of the sandwich.
Sauces and Seasonings for Extra Flavor
The right sauce or dressing can elevate your grinder sandwich, adding moisture and extra layers of flavor. Here are some classic sauces and seasonings to use for your sandwich:
- Italian Dressing – A staple for Italian-style grinders, providing a tangy, herbaceous flavor. Drizzle lightly to avoid sogginess.
- Mayonnaise – A creamy, mild spread that adds richness and a smooth texture to the sandwich. It’s especially good when paired with spicier meats like salami.
- Mustard – Both yellow mustard and spicy brown mustard can give a sharp contrast to the richness of the meats. Use sparingly for a zesty bite.
- Olive Oil – A drizzle of good-quality olive oil adds moisture and a hint of fruitiness that pairs perfectly with the Italian meats and vegetables.
- Vinegar – A small splash of red wine vinegar or balsamic vinegar can brighten up the flavors and provide a tangy kick.
- Seasoning Blends – A mix of oregano, basil, garlic powder, and black pepper can be sprinkled on the meats or bread for an extra punch of flavor.
When adding sauces and seasonings, be mindful of the balance. Too much sauce can make the sandwich soggy, while too little can result in a dry, lackluster bite. Keep it light and focused on enhancing the natural flavors of the sandwich.
Step-by-Step Guide to Making a Grinder Sandwich

Creating the perfect grinder sandwich is both an art and a science. From prepping the ingredients to the final touches, each step plays a key role in achieving a well-balanced, flavorful sandwich. Follow this step-by-step guide to assemble the ultimate grinder sandwich that’s sure to impress every time!
Prepping the Ingredients
The key to an efficient and seamless sandwich-making process is proper ingredient prep. Here’s how to get everything ready for assembly:
- Slice the Meats – If you’re using deli meats, make sure they’re sliced thinly. Most deli counters will slice them to your preferred thickness, but if you’re slicing at home, aim for a thin cut that allows the flavors to meld together without overwhelming the bread. Stack the meats neatly in a pile for easy layering.
- Slice the Cheese – If you’re using block cheese, slice it into thin, even pieces that will layer easily. Provolone, mozzarella, and Swiss cheeses work especially well when sliced thinly for even melting. If you’re using pre-sliced cheese, you’re all set!
- Chop Fresh Vegetables – Slice your tomatoes, onions, banana peppers, and any other veggies you’ll be using. For onions, thin slices are key to getting the perfect balance of flavor without overwhelming the other ingredients. If you’re using pickles, slice them thinly so they can add just the right amount of crunch without overpowering the sandwich.
- Prepare the Bread – Slice your hoagie rolls or submarine rolls lengthwise. Make sure the rolls are fresh but not too soft, as they need to hold up to the fillings without falling apart. If you’re toasting, now’s the time to decide if you want to toast the bread before assembly or after.
- Gather Your Sauces and Seasonings – Set aside your Italian dressing, mayo, mustard, olive oil, and vinegar so you can quickly apply them without fumbling through ingredients. If you’re using seasoning blends like oregano, basil, or garlic powder, have those ready to sprinkle on your sandwich at the right moment.
Assembling the Perfect Grinder Sandwich
Now that everything is prepped, it’s time to layer your sandwich! Here’s a step-by-step breakdown of how to assemble the ultimate grinder sandwich:
- Spread the Base Sauce – Start by spreading a light layer of mayo or mustard (or both) on one or both halves of the bread. If you prefer something tangy, drizzle a little Italian dressing on one side of the bread. Be careful not to add too much—just enough to add flavor and moisture without sogging up the bread.
- Layer the Meats – Begin with a generous layer of your chosen deli meats. Start with the milder meats like turkey or ham, followed by your bolder options like salami or roast beef. Layer them neatly, slightly overlapping each piece for an even distribution of flavors. The meats should cover the entire bread without gaps.
- Add the Cheese – Next, layer your slices of cheese evenly over the meats. Be sure the cheese covers the entire sandwich, creating a solid layer that will melt beautifully when toasted. If you’re using a mix of cheeses, start with the one that melts the best (like provolone or mozzarella) and layer others for extra flavor.
- Add the Vegetables – Now, layer on your fresh vegetables like tomatoes, onions, lettuce, and banana peppers. Don’t overdo it on the veggies—just enough to add crunch, brightness, and freshness without overwhelming the other ingredients. Place these veggies toward the top of the sandwich to help keep them intact during the next steps.
- Season and Dress – Add a sprinkle of herbs like oregano or basil for an Italian touch, and drizzle with a little olive oil and vinegar for extra flavor. If you’re using pickles, place them on top of the veggies for some extra crunch and tang.
Toasting vs. Non-Toasting – What’s Better?
One of the best things about a grinder sandwich is the option to toast it or keep it cold.
Benefits of Toasting
- Melted Cheese: Toasting brings out the best in your cheese, creating a gooey, melted texture that pairs perfectly with the crispy bread.
- Crispy Bread: The heat from toasting makes the hoagie roll crispy on the outside, adding texture that contrasts nicely with the tender meats and melted cheese.
- Flavor Fusion: Toasting allows all the flavors to meld together, making each bite a harmonious blend of savory meats, creamy cheese, and flavorful sauce.
To Toast:
- Preheat your oven to about 375°F (190°C).
- Place your assembled sandwich on a baking sheet and bake for about 5-7 minutes until the cheese is melted and the bread is golden brown. If you prefer extra crunch, flip the sandwich halfway through.
When to Keep it a Cold-Cut Sandwich
- If you’re in the mood for a lighter, refreshing sandwich, keeping it cold might be the best choice.
- Cold grinders are ideal for summer days, picnics, or when you want the crunch of fresh veggies like lettuce and tomatoes without the warmth of toasted bread.
- You can skip the toasting step if you prefer the crispness of fresh bread with your cold cuts.
Adding the Final Touches
Once you’ve assembled your grinder sandwich, it’s time to add the final touches that will make it truly stand out. Here’s how:
- Drizzle with Olive Oil or Vinegar – A light drizzle of olive oil or a splash of balsamic vinegar can add an extra layer of flavor and moisture. This will enhance the flavor of the vegetables and meats, giving your sandwich a well-rounded taste.
- Garnish with Fresh Herbs – Add a final sprinkle of oregano, basil, or parsley for a burst of color and added flavor. Fresh herbs make a huge difference in the overall appeal of the sandwich, especially if you’ve chosen Italian meats like salami or capicola.
- Seasoning Blends – For extra depth of flavor, sprinkle a little garlic powder, onion powder, or cracked black pepper on top of your veggies and meats before closing the sandwich. These seasonings will enhance every bite with added complexity.
Pro Tips and Variations for a Better Grinder Sandwich

Making a grinder sandwich isn’t just about following the basic steps—it’s about customizing it to your preferences and taking it to the next level. Whether you’re looking to make your sandwich healthier, add some creative twists, or figure out the best sides to serve with it, these pro tips and variations will help you craft the ultimate grinder sandwich for any occasion.
How to Make It Healthier
If you’re looking to create a healthier grinder sandwich, there are a few easy substitutions and modifications you can make without sacrificing flavor. Here’s how to lighten things up while still keeping that delicious grinder taste:
- Leaner Meat Options
- Instead of salami or roast beef, opt for leaner meats like turkey, chicken breast, or lean ham. These meats offer less fat while still providing plenty of flavor.
- Grilled chicken can also be a great protein option that brings a fresh, flavorful twist to your grinder.
- Whole Wheat or Multigrain Hoagie Rolls
- Swap traditional white hoagie rolls for whole wheat or multigrain rolls to add fiber and nutrients. These whole-grain options will make the sandwich more filling and offer a healthier alternative to refined bread.
- Low-Fat Cheese
- Choose low-fat or reduced-fat cheeses, such as low-fat provolone, mozzarella, or Swiss cheese. These cheeses melt well while offering fewer calories and fat.
- Alternatively, you can skip the cheese entirely or use plant-based cheese for a dairy-free version.
- Add Fresh Veggies
- Pile on more fresh veggies like spinach, avocado, or cucumbers to add crunch and nutrients. Avocados add healthy fats and a creamy texture without extra calories.
By making small swaps and focusing on leaner proteins and healthier bread, you can enjoy a lighter, more nutritious version of the classic grinder sandwich.
Creative Variations on the Grinder Sandwich
If you’re in the mood for something a little different, try experimenting with these creative variations on the traditional grinder. These twists will give your sandwich a unique flavor profile while still maintaining the spirit of the classic sandwich.
Spicy Grinder Sandwich
If you enjoy some spice, this version is perfect for you. Here’s how to spice up your grinder:
- Add hot peppers like jalapeños, banana peppers, or Serrano peppers for a tangy and spicy kick.
- Incorporate spicy mayo (mix mayo with sriracha or hot sauce) to give the sandwich extra heat and creaminess.
- Try a spicy dressing, such as chipotle ranch or buffalo sauce, to elevate the flavor.
Vegetarian Grinder
For a meatless version of the grinder, focus on roasted vegetables and plant-based proteins:
- Roast bell peppers, zucchini, onions, and eggplant for a warm, savory veggie filling.
- Add hummus or guacamole for extra creaminess and flavor.
- Use tempeh, tofu, or plant-based deli slices like vegan turkey to give the sandwich some protein while keeping it plant-based.
Breakfast Grinder
Why not take your grinder sandwich to the breakfast table? Add these ingredients for a hearty morning twist:
- Scrambled eggs or a fried egg will add protein and richness.
- Layer on crispy bacon for that perfect smoky flavor.
- Add avocado slices for creaminess and a dose of healthy fats.
- A drizzle of hot sauce or a smear of cream cheese can give it an extra kick.
These variations allow you to get creative and tailor the grinder to your tastes, whether you’re looking for something spicy, meatless, or a breakfast-themed twist.
Best Side Dishes to Serve with a Grinder
A grinder sandwich is hearty on its own, but pairing it with the right side dishes can elevate the meal even more. Here are a few excellent side dishes to serve with your grinder:
- Fries – Crispy French fries are a classic side that pairs wonderfully with a warm grinder. You can go with regular fries, sweet potato fries, or even loaded fries for something a little more indulgent.
- Coleslaw – A tangy and creamy coleslaw provides a refreshing contrast to the richness of the grinder. It’s a perfect balance of flavors and textures—especially if you’re enjoying a spicy grinder.
- Chips – For a quick and crunchy side, opt for potato chips or kettle chips. You can also try a mix of tortilla chips with salsa or queso dip for a Southwestern twist.
- Salad – A simple green salad with a light vinaigrette is an excellent way to add freshness and balance to your meal. For something more substantial, try a Caesar salad or a Greek salad with feta cheese, olives, and cucumbers.
- Soup – Pairing your grinder with a comforting soup is always a hit. A tomato soup works wonderfully, especially if you’ve toasted your grinder. You can also go with minestrone, chicken noodle, or a hearty vegetable soup for a more filling meal.
With these side dish pairings, you can create a balanced and satisfying meal that’s perfect for any occasion.
Frequently Asked Questions (FAQs)
When it comes to making the ultimate grinder sandwich, you might have a few lingering questions about the best practices, storage, and reheating methods. Here are some common FAQs to help clarify your doubts and enhance your sandwich-making experience.
Is it possible to prepare a grinder sandwich in advance?
Yes, you can make a grinder sandwich ahead of time, but it requires careful storage to keep it fresh and prevent sogginess. Here’s how to do it:
- Assemble and Wrap – If you plan to make the sandwich ahead of time, assemble the sandwich without the sauces or dressings. To keep it fresh, wrap it securely in plastic wrap or store it in an airtight container. This will help preserve the bread and prevent it from getting soggy.
- Store in the Fridge – Place your wrapped sandwich in the refrigerator. It can last for up to 24 hours without losing too much flavor. However, it’s best enjoyed within a few hours for optimal freshness.
- Add Sauces Later – To keep the bread from becoming soggy, add sauces and dressings just before serving. If you’re using mayo, mustard, or Italian dressing, store these separately and spread them on right before you eat.
Tip: If you’re storing multiple sandwiches, consider layering them with parchment paper to prevent them from sticking together.
What’s the Best Way to Reheat a Grinder?
To keep your grinder sandwich fresh, crispy, and flavorful when reheating, follow these simple methods:
- Oven Method (Best for Toasted Sandwiches)
- Preheat your oven to 375°F (190°C).
- Place the sandwich on a baking sheet and bake for about 5-7 minutes until the cheese is melted, the meat is warmed through, and the bread is crispy.
- For a crispy crust, cover the sandwich with foil for the first 3 minutes, then remove the foil to crisp up the bread for the remaining time.
- Toaster Oven Method
- If you have a toaster oven, it’s a great way to reheat a grinder without losing too much of its original texture.
- Toast for around 5 minutes or until the bread is golden and the cheese is gooey.
- Microwave Method (Quick, but Not Ideal)
- If you’re short on time, you can microwave the sandwich.
- Place it on a microwave-safe plate and cover it with a damp paper towel to prevent the bread from becoming too chewy. Heat on high for 30-45 seconds until the sandwich is warm, but note that the bread won’t be as crispy.
Tip: For the best results, always reheat your grinder on a baking sheet in the oven or toaster oven to retain the crunchy texture of the bread.
What’s the Difference Between a Grinder, Sub, and Hoagie?
While these sandwiches may seem similar, there are subtle differences in terminology, often based on region or local preferences. Here’s a quick breakdown:
- Grinder
- Commonly used in the Northeastern U.S. (especially New England), the term “grinder” refers to a sub sandwich made with a variety of deli meats, cheeses, veggies, and seasonings.
- To grind in Italian means “to crush” or “grind,” and this could refer to the grinding of the sandwich or the original grinding of meats in the recipe.
- Sub (Submarine Sandwich)
- The term sub comes from the shape of the bread, which resembles a submarine.
- This term is widely used across the U.S., especially on the East Coast and in California. It typically refers to any sandwich made with long rolls and stuffed with a variety of fillings.
- The term “sub” is also a shortened form of “submarine,” a type of boat, which is fitting given the sandwich’s long, boat-shaped appearance.
- Hoagie
- The term hoagie is popular in Philadelphia and the Mid-Atlantic region of the U.S.
- There’s some debate about the exact origins of the name, but it’s commonly believed to come from the Hog Island area in Philadelphia, where workers on the docks would enjoy these sandwiches.
- Like a grinder or sub, a hoagie is typically made with cold cuts, cheese, and various toppings, but the name specifically connects it to Philadelphia and its surrounding areas.
Summary: While a grinder, sub, and hoagie may refer to similar sandwiches, the terms are often used regionally. The grinder is more associated with New England, the sub with the East Coast and California, and the hoagie with the Philadelphia area.
Savor the Perfect Grinder Sandwich Every Time
Creating the ultimate grinder sandwich is all about the right combination of fresh ingredients, the perfect bread, and a few creative twists that make each bite unforgettable. From choosing the best deli meats and cheeses to experimenting with healthier options and unique variations, your grinder sandwich can be as simple or as adventurous as you like.
Whether you prefer your sandwich toasted to golden perfection or served as a cool, refreshing cold cut delight, mastering the art of layering and assembling your grinder ensures a satisfying experience every time. With tips on the best bread, sauces, and toppings, plus answers to common questions like reheating methods and storage, you’re ready to craft a sandwich that suits your personal taste.
So, next time you’re craving something hearty, flavorful, and customizable, reach for the grinder sandwich—it’s versatile, easy to make, and perfect for any occasion. Happy sandwich-making!
